Storybook Project… ASL Style

The book “A Natural Approach to the Year” (aka “Year One”) by Tina Hargaden and Ben Slavic outlines the 6th and last instructional cycle which includes the end of the year project. The project is a student-made storybook. Currently, the CI Liftoff Facebook group is abuzz with classes making books. I thought this project was awesome as well, but I did have to make some adaptions to the process to fit ASL.

I mostly followed the same instructions, rubric and rough draft packet, with some slight adjustments. You can find those here. One of my Spanish teacher colleagues created a half page template for the storybooks. Her template was portrait orientation, but my final product would be a PowerPoint, so I tweaked her template to be landscape. You can find that free download here.

As the students were writing their rough drafts, I asked them to sign their sentences first and then gloss them onto the packets. I did not require them to video their rough draft sentences, but I will definitely change that for next year. The problem I ran into is students were “glossing” (or often just writing in English) things that they wanted in their story, but they had no idea how to sign them. When I checked their rough draft and asked them to sign the sentences, many couldn’t. So next year I will have them outline their ideas in the rough draft packet, but they will video the sentences for me to correct and give feedback.

After, completing the rough draft, they began drawing their illustrations and videoing the final draft videos for each page. This year I had the students submit their videos in Flipgrid in topics designated for each page of the book. So essentially everyone’s page 1 video was in one location. This made it very difficult to check each group’s work and progress because I had to look in 15 to 20 different places. Next year I will make a topic for each group and have them label each video with a page number.

In my instructions, I asked the students to turn in the videos in Flipgrid, make the videos square and turn off the audio. I also asked that they download each submission to their phone as they went. Unfortunately I didn’t make that clear enough and about 90% did not save their videos. Therefore I had to go manually download all their videos and give them back to them through OneDrive to be able to put into the PowerPoint. After hours of downloading their videos, my lesson was learned. Saving their own videos will be strongly emphasized next year. I may even have them crop their videos in PowerPoint (a feature only available on the computer program) and not turn in the videos in Flipgrid at all for their final drafts.

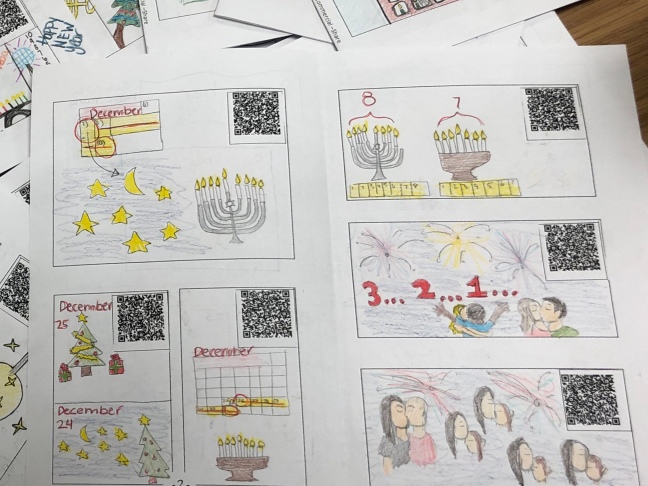
When they completed the illustrations, I collected them and scanned them into images. I returned the digital scanned illustrations to them also in OneDrive. They then took the illustrations and videos and merged them together into a PowerPoint.

I ran into a few snags when they started making the PowerPoints. Our class has an OLD class set of iPads and 6 Chromebooks. I found that inserting videos into PowerPoint only worked in the mobile/tablet apps or the program on a computer. The online versions of PowerPoint didn’t work. Luckily, most kids had phones that they were able to download the apps. I made this tutorial to help guide them through the process of making the PowerPoint.

After all of the PowerPoints are complete, I can choose to turn the best ones into videos. You can do this in the computer program of PowerPoint by recording the timings by selecting “Record” and simply clicking through the presentation. Afterward you can export to video. Even if you choose not to turn them into videos, the PowerPoint itself is awesome. They can click through the pages and replay the videos as many times as necessary to understand.

It’s taken a little over 3 weeks of working on it everyday. I regret that it left little time for input activities, but in May it was a welcomed break from being “on stage” everyday. My students’ and my energies are low at this time of year and it was nice way to end the year with something that gave the kids a fun way to show off all that they’ve learned this year.

Here are a few short clips of the first final projects I’ve had turned in so far. I’m really happy with how they are turning out!

Please let me know if I can clarify any of this!

Keep signing!

Stacy 🤟🏼

“Video and Discuss”: The “Write and Discuss” for the non-written language classroom!

If you’ve done much reading about Comprehensible Input, you’ve probably heard the phrase “Write and Discuss”.  This is a great way to wrap up any CI lesson.  I’m not sure where to give credit for this awesome activity, but I first saw it in some of Tina Hargaden‘s YouTube videos on the CI Liftoff channel.  I’ve since seen lots of examples and blog posts devoted to this gem.  Most recently I really enjoyed reading about all the ways AnneMarie Chase uses it in her classroom here.

In short, “Write and Discuss” is an activity where you review the discussion or story by writing sentences that you create together as a class.  You start by asking the class questions to review what you just discussed in class and create sentences from that information.  You can also ask them to give you a sentence about what you discussed in class.  Then you write the sentences that were created on the board or type them on your computer so that the students can see the spoken word in written form.  After you are done, you have this written documentation of the class discussion or story that you can use for extension activities (translate, quiz, games, etc.).  Often you go back and look at it the next day and have the class translate it together.  This gives the class an opportunity to see the input again and they just might notice some grammar concepts along the way too.

My first impression of the “Write and Discuss” was “Well that’s great and all, but I’ll never be able to do that in my classroom.  My language isn’t written.”  I mean I suppose we could gloss out some sentences, but in my opinion that doesn’t do a whole lot for language acquisition.  Glossing is really just English words that we use to try to write down what we sign.  It does very little for learning to sign.  With all the benefits of the “Write and Discuss”, I was determined to nail down an efficient way to do this in my ASL classroom. 

So written languages document their language by writing, but how does sign languages document their language?  Through video!  And so the “Video and Discuss” was born.  I started trying to figure out the best way to do it.  I could make notes of each class discussion (or better yet get a student to do it) and then video it outside of class.  This would mean spending my entire planning period making videos and even time after school.  One of the benefits of the “Write and Discuss” is being able to create the document in front of the students.  They see it written formally and have a part in the creation of the sentences.  If I waited to video later, the students would be missing out on those benefits.  Not to mention, if I video it during class, I can save tons of time outside of class.  Then all I needed to do is quickly edit the videos together to create the final product.

After much trial and error, I feel like I’ve come close to perfecting the process.  I use a cell phone tripod set up on a podium.  The first few times I did it, the videos took more time to edit than I liked.  I wanted the transitions between sentences to be more smooth.  I needed to trim the beginning and end of each video to cut out the lean in to turn the camera on and off.  I tried using my Apple Watch, but even then, you could see me tapping my wrist every time.  I brainstormed a bit and decided that I needed a more inconspicuous way to turn my camera on and off.  Then I could edit all the clips together without having to trim any videos.  I went on Amazon and ordered one of these Bluetooth shutter remotes. I hang it out of my pocket or clip it to my skirt.  Then after each sentence I simply put my arm by my side to stop the camera, do a little more discussion with the class, and start it again to do the next sentence.


Later, I simply use my phone to edit all the clips together.  I use the Perfect Video app.  It was a few dollars a few years ago.  I’ve used it for years and love it.  I do all my video edits in it.  It’s really simple to use and has quite a few features.  And just like that, I have a video to use in class for review and any extension activities I want to do.  I can use them for translations, quizzes, activities, games, assessments, etc.  I can even share it with my class on Schoology (the LMS I use as their online classroom) or in Edpuzzle.

Example of an in class “Video and Discuss” session after doing a Special Person Interview.  (Please forgive my silliness as I primp before I began.) 

Final product of the “Video and Discuss” from the class above after editing.

I am still working on making sure to make time at the end of each class to do the “Video and Discuss”, but even on days that I have to do it after class, the process is pretty painless.  I do not claim that this is the only way to do it, nor that I “invented” it, but it’s working for me and maybe it could work for you! Hopefully,  I explained this well.  If not, please feel free to ask questions and I’ll do my best to clarify.

img_1421-1

Comic Books… in ASL!

Once I dove into CI, I joined Comprehensible Input groups on Facebook, attended a workshop and started following tons of blogs. I saw a lot of really cool ideas, activities and resources that were more geared toward spoken language teaching. I immediately start trying to brainstorm ways to modify it for ASL.

One of the activities that I absolutely loved was having students illustrate a comic book based off of a story or discussion from class. This is the genius idea of Mike Peto on his blog here. He encourages you to do one each week over the topics or stories discussed that week. You have the students all illustrate them and then you can pick the best ones to put in your library for “reading” materials. This, for obvious reasons, is something that ASL teachers have a lack of. There are very few comprehensible videos of ASL stories for beginning ASL learners to view for receptive practice. Many videos you find are either not comprehensible (way too complex and fast) or not very good ASL.

I finally decided to give this comic book activity a try and it was a success! The week prior to the assignment, we had discussed some of the December holidays during Calendar Talk. I shared the facts about dates and symbols and also some personal narratives about my own family traditions. See one of those class discussions here. At the end of the day, I did a “Video and Discuss” (I’ll explain this in a later blog) to create a narrative about the discussions.

The next day, we watched the “Video and Discuss” and translated it. I answered questions about individual signs and had students identify some aspects of the grammar that they noticed. I could have done a quiz using this video or left it at that.

Next, I took the small clips of sentences that I had pieces together for the “Video and Discuss” and uploaded them into a folder in my Google drive. I took the links for each clip and turned them into QR codes using this website. I pasted the QR codes into a word document and made each 1 inch squares and printed them out. I cut each code and pasted it onto the individual sections of the comic book template. I made front and back copies to hand out to my students to illustrate.

I gave my students the assignment and explained that I wanted them to “read” through the whole book first to get an idea of how it was organized and to how they might want to illustrate each section of the book. It took my students 2 class periods to complete, but it definitely could have been assigned for homework to complete.

I had some that gave little effort, but overall I was happy with the results and some of them were beyond my expectations! I plan on saving the best ones and starting my own ASL library. Eventually, if I do this enough times, maybe I will be able to do free choice reading like many written languages do.

If interested in using some ready made comic book templates with QR codes already built in linked to videos of me, you can check them out here at my Teacher Pay Teacher site. It’s great for a sub day or an “off stage” day for you that still is giving them ASL input.

OWI in ASL

One Word Images (OWI) were one of the fun activities that drew me to incorporating Comprehensible Input into my classroom. When I first read about them, it reminded me of one of my favorite memories with one of my ASL 2 classes a few years ago.

The first few years of teaching, my classroom was on a different hall of our school. Occasionally, if my door wasn’t closed all the way, the door would close by itself. I always teased my kids that it was my classroom “ghost”. When I moved to the classroom that I’m currently in, the students always complained of one spot in the room being extra cold. One day, after one of those complaints, I told them (in ASL) that it is where my ghost sits. This began an entire discussion in the target language about who he was, how he died and why he was hanging around in my classroom. It was SO MUCH FUN!! I remember thinking how much fun class would be and how much my students would learn if we could do that all the time. As it turns out, we can!! And that is with CI!

So what is a OWI? It’s an activity in which you lead your students in the target language to create a character. The character is created completely by the students with you as only the language facilitator. Later you can create a story with the character. All of the video examples of OWIs I found were of spoken language teachers. So I had to adapt it slightly for an ASL classroom.

First you need to assign a few jobs:

  • Teacher #2– This student makes the decisions when the class can’t come to a consensus. This means that all the creative choices are made by the students and NOT the teacher. Of course you, as the teacher, do have some say since you choose the questions to ask and often the choices to choose from.
  • Artist(s)– This student is drawing the character as we create it. He/she takes the decisions we make and turn it into a simple piece of artwork to give an actual visual of the character. My first try at OWIs I only had one artist, but after attending a workshop by Tina Hargaden I may have 2 next time. She suggested having one person drawing the outline and the other person coloring.
  • Secretary– This is a job I had to create to adapt for the nature of the language I teach. ASL is a visual language. To “listen” to ASL you have to be looking at the speaker/signer. You cannot exactly draw and “listen” to ASL at the same time. So I had the secretary jotting down the decisions we made for the artist to refer to as he/she drew. Unfortunately that means the artist is missing out on some of the input. Therefore I would definitely not make the same person be the artist every time.

Then you decide what object you are going to base your character from before you begin. Usually you recommend only objects, animals or food- no people. Then in the target language you ask the kids mostly either/or and yes/no questions to figure out the details of this character. Example questions:

  • Is it big or small?
  • What color is it?
  • Is it happy, sad or mad?
  • How many eyes does it have?

Once you are done creating the character, you can do a “Video and Discuss”. I’ll explain that in a later post. Make sure the artist finishes the artwork before the end and then set it aside. Do not reveal the artwork until the next day! Believe me, the kids will be excited to see it, but make them wait. It builds anticipation and excitement for the day.

I’ve only done it once, so far. I plan to do it again soon. If you’d like to see my first tries check out the videos below.

https://www.youtube.com/playlist?list=PLRwHJLUYXRpGgwd5zl9eU5fzY0Cjo3Fa0

Signing Comprehensibly… What does that mean?

About 8 weeks ago, I was scrolling through Facebook as I normally do to catch up with friends, family and colleagues. I had previously joined a Facebook group for ASL teachers using Comprehensible Input (CI) strategies without really knowing what those particular strategies were. That night nearly 2 months ago, I saw a post by one of those ASL teaching colleagues about “un-targeted” CI. Un-targeted meant no vocabulary lists, no explicit grammar teaching and no textbooks. I must admit that my first thought was that it was crazy!! Just crazy enough for me to do some research.

That post lead to me spending hours watching videos and reading blogs of teachers using these strategies to teach a second language. Most of them being Spanish and French teachers, but all of them were spoken language teachers. It definitely was informative and made me fall in love with CI. Unfortunately, I couldn’t find any ASL teachers using these particular strategies and sharing how they adapted for a language that isn’t spoken or written.

Enter my YouTube channel, “Signing Comprehensibly”. Just before our Fall Break, I finished up my current unit and decided when I returned that I’d jump in to using this un-targeted CI ways of teaching that I’d been obsessing about. So that’s what I did and as I did I threw my phone on the wall and started videoing. I figured that maybe other ASL teachers could watch me struggle and learn through trial and error.

https://www.youtube.com/channel/UCZJfQOTww4jhbXGOjTQRKgw

This blog is also born out of my desire to share my successes and failures as I try things in a completely different way than I have for the last 6 years. I know I’m opening myself up for some criticism. I am hearing and not a native signer. I did interpret for 7 years before teaching and have 2 college degrees in ASL and interpreting. However, I in no way claim to be an expert or a perfect teacher or signer. I am open to constructive feedback, but please BE KIND! 🤟🏼